Pages

Monday, April 30, 2012

May challenge at the Flying Unicorn

I'm hosting a fun challenge this month at the Flying Unicorn.  One of our members wrote these words and I've wanted to do a challenge using her quote ever since.  So often I hear scrappers say that scrapbooking is their stress relief, their happy place, this quote really expresses what so many of us feel about our craft. My challenge is to use this quote on a project, oh there are some other requirements, head on over to the Flying Unicorn forums and check it out.
“There is something to be said about creating something beautiful with your hands even when there is a storm in you mind.” Amy Harlan

Here is my layout that I created using a mix of 7 Dots Wonderland and Dreamer collections. I love love that paper!


These are Manor House blooms heavily sprayed with Black Magic Glimmer Mist.


And like all of our challenges, there is a great RAK to be won by some lucky randomly chosen scrapper!  Everyone is wanting that tool set in the back and those gorgeous Manor House blooms!!


.

Flying Unicorn and Manor House


The Flying Unicorn is very proud to be one of the few US retailers carrying Manor House Creations flowers and this month we've joined together to bring you our month long Flower Fantasy! What could be a more perfect embellishment for your craft project than a perfect Manor House bloom? There will be four week-long challenges in May, featuring, what else but FLOWERS! Manor House is graciously providing RAKS for a randomly selected winner each week.

The Flying Unicorn likes to celebrate in a BIG way and in honor of our Flower Fantasy, all our flowers are 20% off. Now is the time to stockpile beautiful blooms for all your craft projects!

Please join us tomorrow in the Flower Fantasy  Forum for our first week long Flower Fantasy challenge!

Sneak Peek at the Flying Unicorn!

The May KOM goes on sale at 12:01 am May 3rd, whoo hoooo!!  Here's are some sneaks of the projects I've done!  You don't want to miss this one!


Saturday, April 28, 2012

Scrapcake My Private Happiness

Now in my mind, there is nothing in this world any cuter than a sweet sweet puppy!  One of our challenges at the Flying Unicorn this month was to do a project with babies as the theme. My babies have always been puppies so please meet Jezebel at the very sweet age of 6 weeks.  She grew to nearly 100 lbs!  She was a Rhodesian Ridgeback and just the sweetest girl ever!  Oh she was a horrible puppy, chewed everything!  But after much perseverance and work, she turned into a wonderful adult dog that was loved by many!  She had a storied life, she went fishing with my husband at the time who was a commercial fisherman.  She learned to climb up ladder like steps to the wheel house on the boat.  They stayed out at sea for a couple of weeks at the time so she was quite a seadog.  It's funny though, she hated the water!

I made this layout using the gorgeous Scrapcake My Private Happiness collection.  The flowers and vine are Petaloo.  You can get the paper and flowers in the Flying Unicorn Store too.  These flowers are beautiful with this collection.  I stained the lace (from the April KOM) with Lindy's Tibetan Poppy Teal.

I diecut the letters from a blue sheet of  Core'dinations whitewash cardstock using old Lollipop Sizzix dies.  Then I dabbed on some Lindy's Tibetan Poppy Teal mist.  (I purchased alot of my Lindy's mists with dabber caps rather than spray caps, I love them, so much neater and not as much waste.)    The pearls are from the April KOM also.    The quotes are from a set of vellum stickers that I've had for years, no idea who the mfg was but I'm sure they came from Hobby Lobby.
I just did some light distressing on this layout and then inked with Distress Black soot.  The white circle is punched with MS Deco Fans corner punch, one of my favorite techniques and I think Deco Fans is my favorite MS punch.

Jezebel 82
I popped up the letters to give them some dimension, try this, it'll make your flat letters look more like chipboard.
Jezebel 82 closeup

Thursday, April 26, 2012

Flower Fantasy at the Flying Unicorn with Manor House Creations!


FLOWER FANTASY! You know we've always got something happening at the Flying Unicorn and May is no exception, so be sure to join us May 1st as we kick off our Flower Fantasy month! We've joined up with Manor House to bring you a new challenge each week. The Creative Team and designers from Manor House willl be showcasing Manor House's beautiful blooms on our example projects. There will be Manor House flower RAKS too!!

Since it is Flower Fantasy month at the Flying Unicorn, what could be better than flower tutorials? The CT will be posting a different flower tutorial each and everyday of May. The tutorials will be revealed each day on the Today post with a link to each tute. We like giving away "stuff" almost as much as we like scrapping, so, of course there will be randomly awarded RAKS to 3 lucky people that post their flowers made using any of the CT flower tutorials

As always, we'll have our monthly challenges and RAKS too. The Flying Unicorn is a "happening place," come join in our May Flower Fantasy!

Saturday, April 21, 2012

CR Palette 107

I don't do alot of color challenges but when I saw this week's color palette at the Color Room I knew I had to give it a whirl as red, black and cream are my favorite colors to scrap!  I think they did this just for me!!  ;-)

I went to my large stash of G45 papers because these colors are predominant in alot of their collections.  I ended up with a red sheet from the Fashionista collection and 2 sheets from the new G45 collection, Kraft Reflections.  I added black and red cardstock from Bazzill for background framing.  I was in a messy mood so I inked up the edges really well with Distress Black Soot and then wet distressed.  My fingers still look dingy from that!  The flower is a beautiful bloom from Manor House.  It was white but I sprayed it with Glimmer Mist burnt red and Lindy's Peony Scarlett Red.  I added the weathered clock diecut to accent the bird (Recollections) on the wooden Kaisercraft cage.  The umbrella man just looked kinda cute tucked in there, so he became part of the layout.  I love the little umbrella man!!

Thank you Jen aka JRabs for taking this picture of me!  And thank you Photoshop, love how I can magically erase years with that program!!  These are my two sweet babies, the ever famous Chena, Escape Kitty's sidekick and my very sweet and needy Nika who is most often called Noodle!


Thanks for visiting!!  I always appreciate your visits and comments.

Lets get organized with an activity journal

Happy Saturday!  Hopefully today is a scrappy day for you and your mojo is flowing strong!  I shared a little of my journal with you earlier and today I want to show it all to you in its finished state.
 I am using this journal to keep my scrappy world organized.  Yeah, I’m a organization freak, I make lists and more lists, my scraproom is never a total mess, I have to be in control of these things at all time!  Being on a Creative Team sounds all glamorous and fun, and it TOTALLY is, but with all that fun goes a lot of work.  We have projects to complete, deadlines to meet, and always plans to make to keep our awesome members, interested and excited about the happenings at the Flying Unicorn!  To help keep me organized, Ialtered a standard 3 ring binder.  The one   I chose is a 1” 3 ring binder that has a clear plastic overlay on the front and back of the binder so that I can slip a page under the plastic.   Let’s begin with the front and back covers.

Front:  I used Creative Imaginations IOD Devotion to make this page, this is one of my most favorite ever paper lines, well of course it is, its red, black and ivory!!  The image is an awesome greeting card for Anne Taintor Inc that I found while on a scrappy retreat in Ohio.  I just love the inscription on her dress!  I stickled some ScrapFX chippy flowers and added black centers and scattered them amongst the printed flowers.  I fussy cut the left side of this LO from Devotion wave and layered in other papers from the Devotion collection.
Cover

The back again features a greeting card image from Anne Taintor Inc.  I thought the inscription was appropriate for scrapping.  It sums up my thoughts on having a scrappy budget!!!  I used a mix of  Creative Imaginations IOD Prevencial and Devotion papers, that yummy yellow and purple flowers are Manor House Taneisha and Country Lane Charm, and the small wine colored flowers are Petaloo.  I also used ScrapFX Funky Flowers, they are the dark red chippies on the Dusty Attic corner flourishes that I painted white.
Screw the budget
I also used some floral stickers from the IOD Devotion collection. I love the look of the stickers combined with the Manor House flowers and ScrapFX chippies. Here’s a closeup:
Screw the budget closeup
Now for the divider pages, I purchased standard notebook dividers that have tabs on them.  I made my layouts so that they were the exact same size as the divider pages.  Then I decided that I really wanted the layouts to be protected so I bought some 8 1/5 x 11 scrapbook page covers at Michaels.  They are really inexpensive if you catch them on sale or use a coupon.  You will need to trim the left side off the page covers, this is the side that has the punched holes.  Then you will need to carefully line up your divider with the page cover and mark where the tab will be on the page cover. Using your craft knife, cut a slit large enough to slip the tab through.  In this picture you can see that I have trimmed off the left side and lined up the tab.
Page cover
I found that it was not necessary to adhere my layout to the tabbed divider page, just slip it down into the page protector.  If you decide not to use the page protectors then you will need to adhere your layout to the divider page.  I also found that it works better to punch holes in your layout AFTER you have slipped it into the page protector, that way your holes will be lined up perfectly.
Journal open
Here are some of the layouts I used in my divider pages.  I used the March KOM for these pages, it’s a mix of Inkido, Kanban and BasicGrey papers
Journal page inside

Vogue
This page features Kanban with some BasicGrey and Inkido mixed in – all from the March KOM.  The dressform chippy is from Fabscraps.
Live the Life
This page was done with Scrapcake One Moment in Time collection.  That gorgeous butterfly is from Donna, thank you so much, it was perfect for this page.  The image again is from from Anne Taintor Inc.  The Dusty Attic is colored with Glimmer Mist in walnut gold.  The flowers are layered hydrangeas from the April kit.

Popular girl

If you need a journal, give this a try.  It would make a great gift for a student or a friend.  I love that its so versatile and organized!  You can have as many or as few tabbed pages as you need.  Right now I have four, To do list, challenges, calendar and SHOPPING LIST (most important!!) and I have room to add more dividers if I need them.

Monday, April 9, 2012

Travelling....again

Hi everyone, we are on our way to Illinois to spend some time with Dick's family.   It's a long drive from NC to Illinois so I had to find something to do!  I've been wanting to try my hand PSE, I don't know enough, LOL!!  I used Printmaster which is a simple inexpensive graphics program that I have used for years!  I would love for you to use my sketch and please tell me if you do and leave me a link, I'd love to see your interpretations of my sketch.

Sunday, April 8, 2012

Mandy's Flying Unicorn Paint It On Challenge.

Mandy is hosting a Paint it On challenge at the Flying Unicorn this month!  All you have to do is use paint on two separate items on your project.  There's a great RAK offered too, so go check it out!

Here's my inspiration piece for Mandy's challenge.  I used Prima Sun Kissed papers and 7 Dots Dreamer, both available at the Flying Unicorn store! the border cut mat and the scraps are 7 Dots. The flowers were made with a Spellbinders die and thank you to LisaG ( http://what-a-beautiful-mess.blogspot.com/) for her tute on these flowers.


Closeup of the sunflowers, I really love them!!


Thanks for stopping by!!!  i really appreciate it!

Saturday, April 7, 2012

More from the April KOM from the Flying Unicorn!

Have I told you yet how much I LOVE this kit??  LOL, I love the diversity of the kit, the soft romantic colors paired with the masculine burlap look papers from Glitz, makes for such a great kit that has so many possibilites.   I have done 9 layouts with this kit!!  Here is my latest layout.This is the 3rd layout I've done with the Glitz French Kiss and Pretty in Pink papers.  Have to say that French Kiss is one of my favorite paperlines from CHA winter 2012.   I made the rosettes, I love using those on a masculine page.  One thing to note, you do not need the mini rosette die to make smaller rosettes, simply trim off part of the diecut from the straight edge side and cut off a few segments and presto, you have a mini rosette.  They look great stacked as I have done here on two of the rosettes.  I love that look!  The Dusty Attic piece and Petaloo Cantebury vine spray are from my stash as are the key, wheel and button.  Everything else is from the kit.  I cut the letters from cardstock and popped them up to give them a stronger appearance.  I bundled up some string to make the string bow, I like how that looks!
Dad 2012
Here are a couple closeups:

Dad closeup
Dad closeup1

 Oh gosh, I almost forgot the most important thing!!! I used that FABULOUS sketch of Shona's to make this LO!!!  We have had a lot of fun teasing Shona about her sketch!  It was never intended to be shown as a sketch, but was a quick drawing Shona did for her own use.  She made one fatal error, she sent it to Alda, oops!!  That totally boomaranged and now this famous sketch is supporting a sketch challenge at the Flying Unicorn this month.  And wow, the LOs done with this sketch are great!

Wednesday, April 4, 2012

More from the April Flying Unicorn KOM

Wow, with the paper addon to the April kit you can make so many LOs, cards, etc. whatever your please is.  I think I have made 8 layouts so far  and I can still get at least a couple more out of the kit!

ON this first LO I used a Prima mask and molding paste on the right side to add some interest and texture to the cardstock.  I used a sheet of Arbor Ruby Rock-It from he August Moon collection and a strip sheet from Meg's Garden on this layout.  Lots of border punching too, all with martha Stewart punches.  Everything on this page except the letters and leaves came in the April kit.  It really is an awesome kit - so many great things you can do with it.  Those gorgeous blooms are Manor House, aren't they just lucious?  Oh yes, the little girl is me with my baby brother, photo from 1957.  Hmmm I need to add that little detail to my layout!


My bff's and I decided to celebrate our 40th year by taking a trip to the wine country of California.  We spent a week there sampling the wine and just having fun!!  Again I used Ruby Rock-It August Moon papers on this combined with a sheet from the Fabscraps Organic collection.  I particularly love that Dusty Attic piece (from my stash), it was so perfect for this LO.  I painted it with acrylic paints, smooch paint on the grapes which I then stickled.


One of the things I really love about this kit is the diversity of the papers included.  The Glitz French Kiss and Pretty in Pink papers really worked well together.   This is a photo of my Mom's sister, Elsie.  I made the peach flowers from Core'dinations cardstock (included in the kit) using a McGill Floriano punch.  I especially love the lace that came in the kit, its sooooo feminine.


This layout is also done with a combination of the August Moon and Organic collections.  They work sooooo well together!  I added the Dusty Attic piece and Family embellie from my stash. The journal reads:
Mom and her brother, Alex.  I often called Uncle Alex my Uncle Daddy because in many ways, he was a father to us when my Dad had to be overseas without us.  Dad did two one-year assignments in Vietnam and a year in Korea, and six month in Nepal.  During these times we always returned to NC so that we would be among our families.  Uncle Alex always helped Mom find a place to live and he was always there with a strong shoulder for Mom to lean on.  One house that we lived in was so close to his office that he stopped in nearly everyday for coffee and just to check on us. 


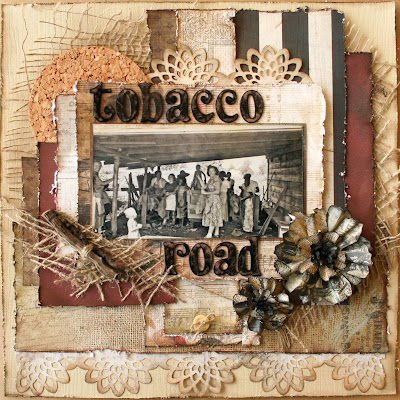
This layout is a companion page to Tobacco Road that I revealed yesterday.  I wanted to tell the story of raising tobacco here in NC as it is was such an important part of the economy here.  My greandparents on both sides were tobacco farmers.  I am from a rural area of NC and farming is what everyone did back in the day.  Here's the journal if you'd like to know a little something about "barning tobacco" as we call it.

“Barning tobacco” was hard dirty work.  Tobacco ripens from the bottom of the stem up and the first pickings of the season are the toughest.  The field hands spent their days stooped over, picking the bottom leaves from the stems and placing them in a wooden cart that was hauled up and down the rows by a mule or horse.  As the season wore on, the work got a little better in that picking the leaves further up the stem didn’t require so much stooping.

When the cart is filled it is taken to the tobacco barn to be strung on poles for later placement inside the barn.  The barn usually had a shed off the side where the “stringers” and “handers” did their work.  The handers gathered 3 or 4 leaves of tobacco together and handed them off to the stringer who then looped the tobacco with string onto a pole.  When the pole was full it was hung there in the shed until the end of the day. 
Green tobacco is really sticky and leaves a gummy substance on your hands.  We had to use Lava soap, which is harsh and gritty, to get our hands clean.  Imagine how much dirt and sand is stuck to those first leaves coming off the bottom of the stalks.  Don’t forget that here in the hot southern summer, it is humid and often 95º or higher.  I’d call this a true recipe for misery!
At the end of the day, the field hands passed the poles of strung tobacco into the barn where it was hung to dry and cure.  The barns had furnaces, often oil fired, to speed the curing process.
When I was growing up in the sixties, the field hands were paid 75¢ an hour and the handers and stringers were paid 50¢ an hour.  The handers and stringers were female and the field hands were male.   These were the summer jobs available for kids in those days, I guess you could call it character building!  Today, barning tobacco is a whole different process and now most of the laborers are migrant farm workers.  I think it would do our youth a lot of good to put down their assorted electronic devices and engage in some manual labor, perhaps building some good character like that of our mothers and fathers, many of whom  grew up where manual labor was just part of the daily routine.

I  used Lindy's Cattail Copper Brown and  Gator Gumbo Olive mist stains to color the Dusty Attic piece.  I just dabbed it on and it gave such a pretty patina effect.  I painted the Copper Brown onto the roses.  I love the old metallic effect.


Thanks for stopping by my blog, I really appreciate it!  I hope your day is scrap filled and fantastic!!

Tuesday, April 3, 2012

Flying Unicorn April KOM

I know I keep saying this, but seriously, the April kit is just so incredibly gorgeous and its the best kit ever!  I think what impressed me most about this kit is that it is so full of goodies, it's really an incredible value.  There's a beautiful sampling of papers from Glitz, Ruby Rock-it, mini papers from Meg's Garden,  and Fabscraps all coordinated to complement each other.   Then there's the OH MY GOSH, how cool is that, wooden birdhouse just waiting for you to decorate. Alda has selected a wonderful fusion of flowers and embellishments that will go perfectly with the the papers.  When I get my kit, its a complete suprise package and I am so amazed at all that comes out of the box!  There are two paper add-ons this month as well as a flower add-on.  If you can swing it, you are really going to want the patterned paper add-on because it is additional papers that coordinate with those in the kit.  Of course if you've got some spare change, well you're going to want ALL the addons!!

This is the first layout I did with the kit and it is my favorite.  The photo is one that I recently took in the Everglades while vacationing in Florida.  The bird is a Snowy Egret showing his breeding plumage.  He is really such a beautiful bird.


I used Ruby Rock-It papers from the August Moon collection, these papers are so soft and pretty.  I added a few things from my stash to this layout, the Dusty Attic pieces, the Prima resin bridge and greenery.  That fabulous fence is wooden and comes in the main kit.  It's a nice length too, I used it on several LOs and have a little piece left still!

Closeups:


I love Glitz papers and their most recent collections did not disappoint!  The kit has a meld of papers from the French Kiss and Pretty in Pink collections.  I used papers from both collections on this layout.  The photo is probably from around 1951 and shows a group of ladies "barning tobacco" as we say it here in the south.  They are handing the tobacco freshly picked from the fields to a stringer, who is stringing the leaves onto a pole in preparation for going into the barn to cure.  I added the fabric burlap and cork from my stash.  The cork was a sample coaster than I got at a Home Show from a cork flooring mfg!  I knew it would look good on a layout some day!  I made the flowers using Alterations Tattered Floral die. 


I really love how the letters look. They are shiny black Thickers that came in the kit, and I just didn't think they looked quite right on my layout. So I scuffed them up with my sanding block and then inked with walnut stain. I think its a perfect look for this page.


Here is the way cool OTP project!  I used papers and embellies from my stash for this as I wanted to keep the kit papers to use on layouts.  The little birds perched in the doorways did come in the kit and they are just what my birdhouse needed!


Here's one more that I did with the kit.  It's a mix of Fabscraps, Ruby Rock-It and Meg's Garden.  I added a sheet of white cardstock, the one fuschia colored flower  and the Dusty Attic pieces from my stash to this LO.  The leafy vines are cut with the Spellbinders Heartfelt Creations Bella Rose die and stamped with a matchng HC stamp.  I got out my Martha Stewart punches and kind of went crazy!


I'll have more kit creations to share with you this week so be sure to stop by again and even more important, visit the store to get your kit.  It goes on sale tonight, at 12:01 am, April 3.  I know you're going to love this  kit!!

Thanks for stopping by, I really appreciate it!


LinkWithin

Related Posts Plugin for WordPress, Blogger...