Pages

Friday, January 30, 2015

A vintage LO with Graphic 45 Communique


I was digging around one day looking for something new to scrap and remembered that my sister -in-law had given my husband a disc with some photos scanned onto it.  Although, we've had this disc for several years, we'd never looked at it.  Oh my goodness, I found some real treasures on that disc!

This photo was the one that excited me the most.  It is my husband's grandfather, a doughboy, as the WW I soldiers were often called.  He was preparing to go to France.  The acompanying post card was one that he sent to his future bride.  It is very telling of the times in that the address is simply her name and the town she lived in.  The post card is dated July 29, 1919 so he must have sent it after he returned home from France.  I made a journal pocket behind the photo and tucked in a copy of a newspaper article that tells of his Company A preparing to go to Camp Cody and then on to France.

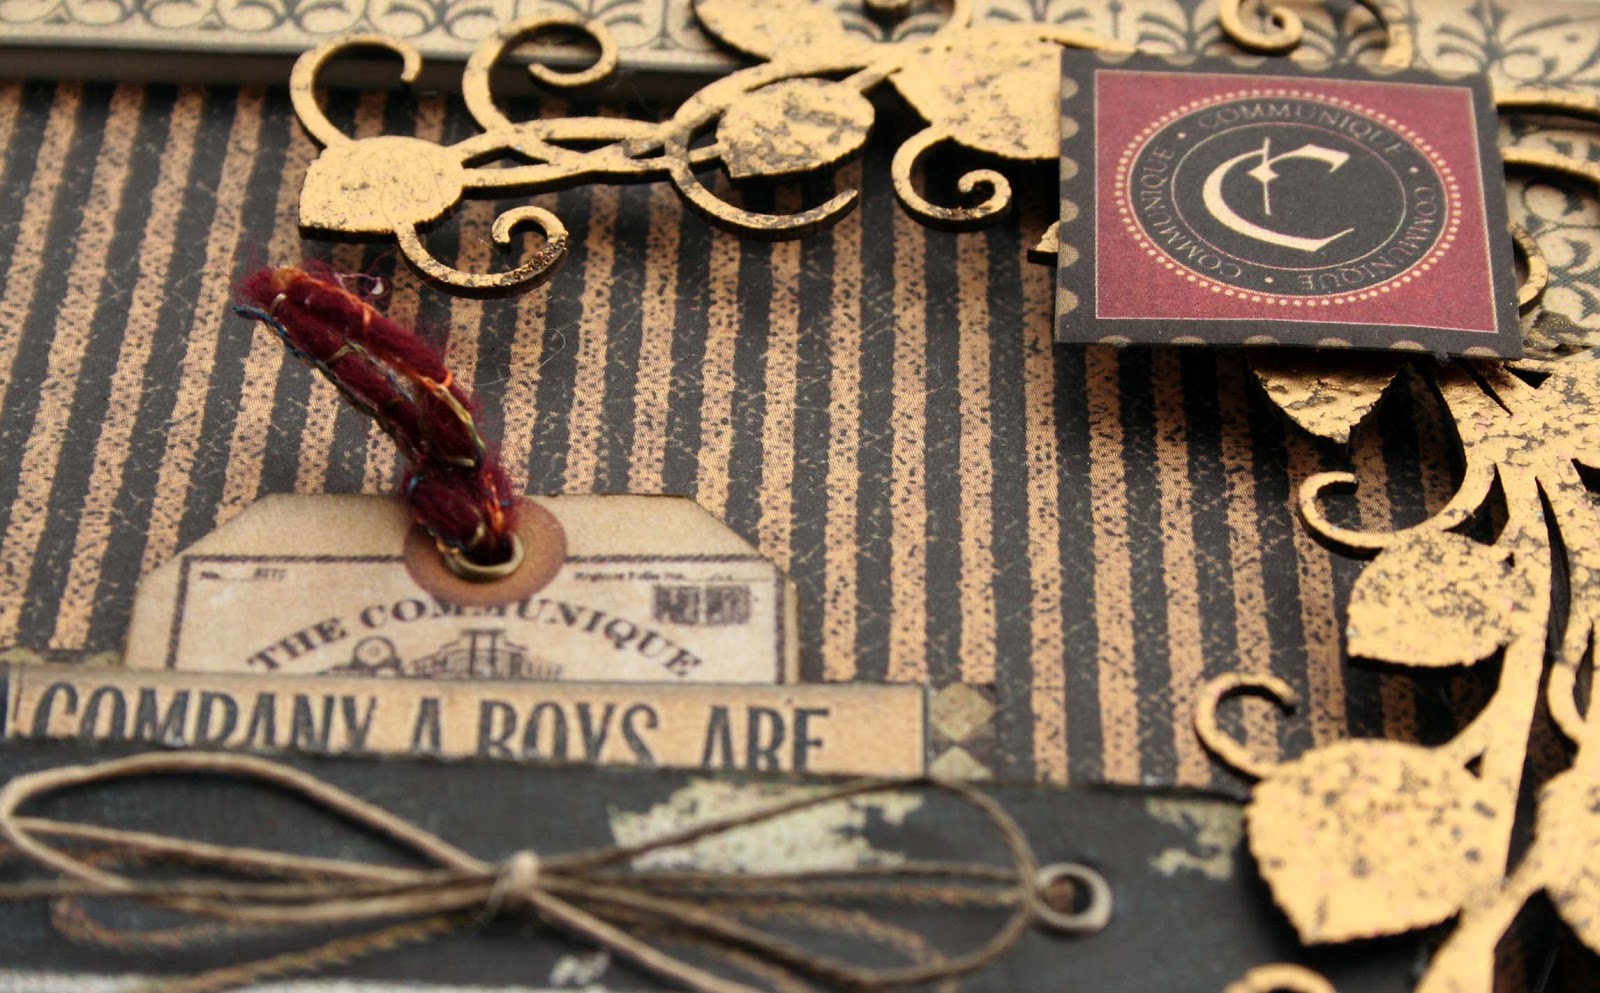
I've used Graphic 45's Communique collection for this.  It is an older collection, but one that I really love.  It works well for more masculine layouts and I love the black, ivory and red of these papers.


The two corner pieces are Creative Embellishments chipboard and are covered with Stampendous aged gold embossing enamel.


Thanks for stopping by and visiting!  I appreciate it so much!

Monday, January 26, 2015

Dressed in Couture - Graphic 45

One of my favorite things to alter is a dressform.   This one came from Hobby Lobby and I used Graphic 45's Couture collection to fashion this dress.  The dress has a drop waist and a slightly gathered skirt with a short tulle and a floral bloomers  train.  Prima Winthrop flowers in turquoise accent the waist and shoulderm along with draped beads complete this Couture look.

This is the first dimensional dressform that I've worked with and it is easier to work with than a flat dressform.


I am sorry that I didn't take a photo of the dressform before I altered it, but it looked very much like this one except that the skirt was floor length and had hooks on it to hang necklaces.  My husband cut those off for me.


To make the skirt I put a machine gathering stitch along the top of the paper for the skirt.  Then I damped the paper and carefully gathered it.


Thanks for stopping by my blog.  I appreciate it so much!!


Wednesday, January 21, 2015

More projects with Swirlydoos January KOM and Creative Embellishments January challenge

The Swirlydoos Kit Club January Embellishment kit includes a Graphic 45 Staples tag album and you know how much I love tags!  Of course, I had to make a tag album with the fabulous Blue Fern Sanctuary papers featured in the kit.  I used the cut apart Calling Cards paper as the theme for my tag album and chose some sentiments from the Heidi Swapp Word Jumbles stickers, also in the Embellishment kit.

Here is the cover that I embellished with flowers from the Flower Kit as well as some roses from my stash.


I took the album apart to photograph the rest of hte pages so that you could see all the details.  The main kit includes a set of Bo Bunny stamps and I used one of those stamps to stamp  the bird cage and fussy cut it.


Flowers and lace from my stash.
I cut a Spellbinders frame and embossed it with Stampendous aged gold embossing enamel and layered behind the calling card.  The flowers are from the
Flower Kit.

The lace flower is from the Flower kit.  It was white but I misted it to change the color.  


The bird on the branch is a Prima wood icon, from an earlier kit, roses and doily from my stash, the lace flower and dangles are from the main and flower kits.


I embossed a Sizzix frame with aged gold embossing powder.

The doors are included in the Embellishment kit and the flowers are from the main kit.


The roses are from my stash and the butterfly is from an earlier kit.


Here's a layout I did where I extended the photo onto the background with gesso and Silks paint.  I tip my hat to Solange Marques who does this technique so incredibly well!

I first  spread a layer of heavy gesso from the edge of the photo feathering it out on the paper.  Then I used acrylic paints to entend the colors of the forest.  Perhaps a different color background paper would have worked better.    I do like to try all kinds of things and this was fun, I will try it again.
  
The papers I have used are Blue Fern Studios Sanctuary collection and are from the January Swirlydoos Kit.  The embellishments are from my stash.

I also did this layout for the monthly challenge at Creative Embellishments.  The challenge was to use this image as inspiration and use mixed media on your layout.


I was inspired by the beauty of the landscape and so I chose a fall landscape for my layout.  I used 13 Arts Ayeeda paste  and Silks acrylic paint to create my forest behind the photo.  I also stenciled the title with Studio 490 gold embossing paste.  I've used Flourish 10 on the right side of my layout and colored it gold with Stazon gold ink.

Creative Embellishments Flourish 10 is a great flourish to use with your flowers!


I loved these mixed textured blooms from Petaloo!


Thanks for stopping by!


Monday, January 19, 2015

A simple card with Fabscraps and a Julie Nutting stamp!

Yeah, I'm a crazy old poodle lady and my husband is currently building a 1948 Ford convertible street rod.  So I tease him and ask him to paint it pearl pink and put poodle graphics on the side for me.  Then I will dye my hair blue and ride around with the spoos in the back seat with a big hat on my head trailing ribbons as I go down the road.  LOL, can you just picture it?  Ha ha ha.

OK so what kind of cards does a crazy poodle lady send?  Poodle cards of course!  Fabscraps has a new collection call Love 2 Travel and one of the papers is called Paris and of course features graphics of the Eiffel Tower.  I thought that was the perfect paper for this card with Julie Nutting's Halie doll and her poodle. Now there really is no such thing as a French poodle, they are simply poodles, toy, minature, or standard, but still many people think French poodle so I thought this would make a cute card!  It's a quick simple card and I've listed the supplies and instructions below.    You could alter the design to use any kind of fussy cut image you have if you don't have any Julie Nutting stamps.


For This Project You Will Need:
    FabScraps C73 Love 2 Travel 001 Paris - 1 sheet
    FabScraps C73 Love 2 Travel 002 Map - 1 sheet
    FabScraps C73 Love 2 Travel 003 Australia - 1 sheet
    Pink cardstock
    Cream cardstock
    lace
    Sentiment
    Flowers and leaves

Instructions:
  1. Cut a 5" x 8.5" rectangle from  001 Paris.  Ink and distress the edges as desired.
  2. Cut a 5.25"x 8.75" rectangle from pink cardstock and adhere the Paris rectangle to it from step 1.
  3. Cut a 10.75" x 9" rectangle from cream cardstock and fold in half to form the card. 
  4. Chose your sentiment and cut a rectangle to mount in on such as "Happy Birthday" in my photo.
  5. Cut a green oval, about 3.5" x 5",  from C73 003 Australia.  Use foam or cardboard to pop up the oval and adhere to the upper left of the the layers from step 2.
  6. Stamp a pleasing image(s) that will go with your card onto 002 Map and fussy cut.  I have used Julie Nutting stamps for the girl and the poodle.
  7. Use foam tape and pop up the stamped image and adhere over the oval on the left side of the card as shown.
  8. Embellish with your sentiment, flowers, lace, and leaves and you are done!


Sunday, January 18, 2015

New Fabscraps Love 2 Travel collection

I have to say that this layout almost got the best of me as it just didn't want to fit the vision in my head.  The red cardstock started out as the base but as you can see, it ended up being my 3rd layer.  I had masked on some circles, added some pops of blue, red, and gold  and generally made a big mess, LOL.  I was not happy with it so I gave it a spray of fixative so that when I painted over it all with white gesso the colors would not bleed through.  Then I flicked some red paint over the entire page and I am satisfied with this reslut.

I dabbed silver paint and then added some random silver embossing powder on several chippies to use under my floral clusters.  Petaloo Botanica flowers, some leaves and a few berries finished up my look.

Eagle, Alaska is a small town in Alaska on the Yukon river.  You can only drive there in the summer as the roads are impassable in the winter.  We were there for their July 4th celebration and it was a pure slice of Americana!

Journaling:
Eagle, AK is a sleepy little town that seems to exist in another time, when life was a bit simpler. There’s a well in the center of town where many people draw their daily water as most homes do not have running water. The streets are dirt and the structures are wooden and old.

Their 4th of July parade was the perfect little town parade. The kids rode their bicycles and had cards on their bicycle spokes so that they would make noise. There were little flags and crepe paper streamers. Some people decorated their four wheelers and drove those in the parade. The Model T in these pictures has been in the same family ever since it was brand new. It was trailered to Eagle from Fairbanks. That old truck spit and sputtered and didn’t go many yards before the driver had to get out and put water in it. And, of course, there was a fire truck and an ambulance in the parade.


For This Project You Will Need:
• FabScraps C73 Love 2 Travel 1 sheet of 007 and 1 sheet of 008
• Red cardstock
• MC73 001A Journal Book Viewing Disk
• Stencil and modeling paste
• White gesso
• Embellishments of your choice, i.e. flowers, vines, leaves, etc.

Instructions:

1. Use white masking paste and stencil a pattern on the red cardstock. After that dries, paint over the entire sheet with white gesso. After it dries, tear about a 1/4" - 1/2" strip all along the outer edges being sure that when you tear you expose some of the red paper.
2. Cut an 8 1/2" circle from the center of Stars and Stripes 008. Then cut an 8" circle out of the 8 1/2" circle leaving you with a narrow circle border. The remaining paper will be the base layer of your layout. Use the inner circle as mats in step 5.
3. Cut a 9" circle from the center of America 007. Glue the narrow circle strip (dark blue side) from step 2 onto this circle (flag side) centering so that it makes a border all around. Ink and distress if desired. The remaining paper will be the 2nd layer.
4. Take the leftover paper 007 from step 3 and heavily distress the edges, ink, and then glue on top of the base layer 008 (dark blue side). Then glue the masked red cardstock from step 1 onto 008.
5. Mat photos with the dark blue side of 008. Cut small rectangles from 008 (stripes side) and mount the titles. Ink as desired. If using journaling print on white paper and mount on the dark blue side of 008.
6. Fussy cut one of the Viewing Disks from MC73 001A Journal Book, ink and distress as desired.
7. Center the layered circles from step 3 on to the layers in step 4.
8. Take a little red paint and water it down a bit and then dip a paint brush in it and flick red paint specks over the layout.
9. Pop up the photos and title(s) with cardboard or foam tape and add to your layout as shown.
10. Embellish to your liking with flowers, leaves, vines, etc.

Thursday, January 15, 2015

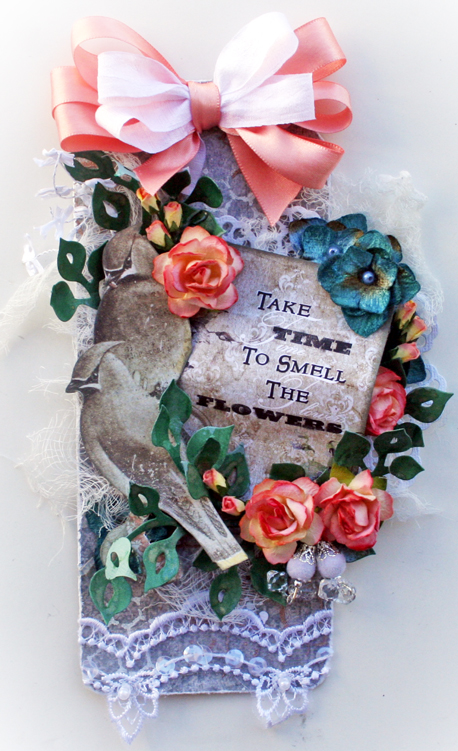
January 12 Tags of Savagery!

Join me every mid-month for a tag tutorial and challenge at Swirlydoos Kit Club.  We're going to explore different techniques each month with our tags and hopefully have lots of fun!

This month we're going to think about layers.  When I make tags, I love lots and lots of layers and dimension.  With a tag, you don't have to worry about it being too thick to fit in an album so I say pile on the goodies!

Let's talk about layers on tags for a minute.  I use alot of diecut frames on my tags for layers.  I love to layer different size frames over each other, thereby creating lots of layers.

Ok let's get started on this month's tag.  Below I've listed the supplies I used, most of which, comes from the January Swirlydoos kit.  You can certainly go free style and use whatever you want!

Supplies:
  1. Tag - 3.5" x 8.5" cut from Bo Bunny Double Dot Shadow Vintage
  2. 3" x 4" card - your choice cut from BFS Calling Cards paper
  3. Fussy cut birds - from Blue Fern Studios (BFS) Birdsong paper
  4. Green cardstock for leaves
  5. Masking paste - Art Anthology Sandstone from the Mediums kit
  6. Mask - Art Anthology Cracked from the Mediums kit (I used Prima's crackle mask as I did not get the mediums kit.)
  7. Mask - Crafter's Workshop chicken wire (from my stash)
  8. White paint or gesso (from my stash)
  9. White lace or trim (from my stash)
  10. leafy vines - diecut with Die-namites large ivy die from a kit several months ago. You could use a chipboard vine, leaves, or a floral vine in its place.
  11. Mist - two colors, I used Lindy's Ponderosa Pine Olive and Frosty Forest Green (from my stash)
  12. ribbon (from my stash)
  13. 5" white doily -  diecut with Kaisercraft's doily die, (from my stash) you can use a commercial 6" doily, as I don't think I've seen a 5" doily
  14. Cheesecloth - from the embellishment addon
  15. Cardboard or sticky foam to pop up layers
  16. Flowers - I've used roses from I Am Roses (stash) and Petaloo Chantilly Velvet Hydrangeas (blue) from the main kit. ( I sprayed them with a blue mist to make them a bit darker.)
  17. Prima Velvet Baubles - from the main kit
  18. Ink - Prima Old Road, I believe this came in an earlier kit, it goes perfectly with these Blue Fern papers.  If you don't have it, black or brown would work fine.
  19. Glue

Step 1:
Use the Cracked mask and Sandstone paste to randomly mask on your tag.  Let that dry and then using a chicken wire mask, pounce white paint randomly on the tag. 

Note:  The masking and paint dribbles are almost covered up in the final tag - that happens to me alot!  :-)  It is nearly invisible in the final photo but it shows a bit more IRL.  You can omit these steps if you wish.


Put a little white paint on your craft mat and then add a few drops of water to make it thinner and then flick onto your tag.


Step 2:
Distress the edges of your tag,  I did not ink my edges as I wanted a white edge. Cut a piece of white lace or trim and glue to the bottom of your tag.


Step 3:
Diecut several leafy branches from cardstock and then color with two different mists.  I use two mists because leaves in nature are not a flat single color so using two colors makes the leaves more realistic in appearance.  I use a dabber top on my Lindy's but you can spray on your mist or use a paintbrush to apply.  Be sure to allow the mist to dry before adding the 2nd mist.


After the leaves are dry, give them some shape with a stylus ball.  If you don't have one of these,  I have used the end of a mechanical pencil and I bet the end of a Sharpie pen would work.


Step 4:
Take one of the notecards and give it a good wrinkle as shown and ink the edges. We are going to layer some flowers under the wrinkle so be sure you have room to nestle in some blooms.


Step 5:
Add a doily to the tag, letting it hang off the right side.  Then cut a couple of pieces of cheesecloth and glue over the doily.  Pull the threads and "mess it up" a bit.


Step 6:
Now add the note card.  The only adhesive I used at this point is a foam square on the upper left corner and on the lower right corner.


Step 7:
Fussy cut the birds and ink the edges.  Then add two layers of foam or cardboard so that when you place them on the tag they will fit over the popped up notecard.  (Note, I ended up cutting the leaves off the bottom.)  Place on the left side of your tag so that they cover part of the notecard.


Step 8:
Arrange the leafy vines on the tag, tucking some under the birds so that it appears they are sitting in the flowers.


Step 9:

Now add flowers.  On the right side be sure to tuck some flowers under the notecard such that they are peaking out.  Tuck some hydrangeas under the bird and around the upper right corner of the notecard.    In the lower right rose cluster I've tucked a couple of Prima Velvet Baubles into the cluster.

I tucked a bit more cheesecloth under and around the birds.  And to finish it off, I added a bow that I tied with the Bow-it-all.


If you want to use the tags that came in the main kit, here's a simpler version of the January Savagery tag. 

Here are the two tags together.  Note that I changed the ribbon on the larger tag.


Now I know some of you are wondering what do I do with all these tags?  Well I give them away by including them in my RAKS, attach them to gifts, use them as cards by simply writing a note on the back or cutting a cardstock card large enough that I can attach the tag to the card, voila, instant card, or attach to a layout.  And sometimes I just put them in my treasure box and take them out and admire them now and again!


LinkWithin

Related Posts Plugin for WordPress, Blogger...