I think step cards are so pretty and really, they're not that hard to make once you get the hang of it! I've made a cutting and folding template for this card that makes the process so much easier. You can download the template here and below is a Snapguide tutorial for how I made the card.
I've used Graphic 45's new Christmas Carol collection to make this card using only the Ephemera Cards and 6 x 6 Patterns and Solids pad.
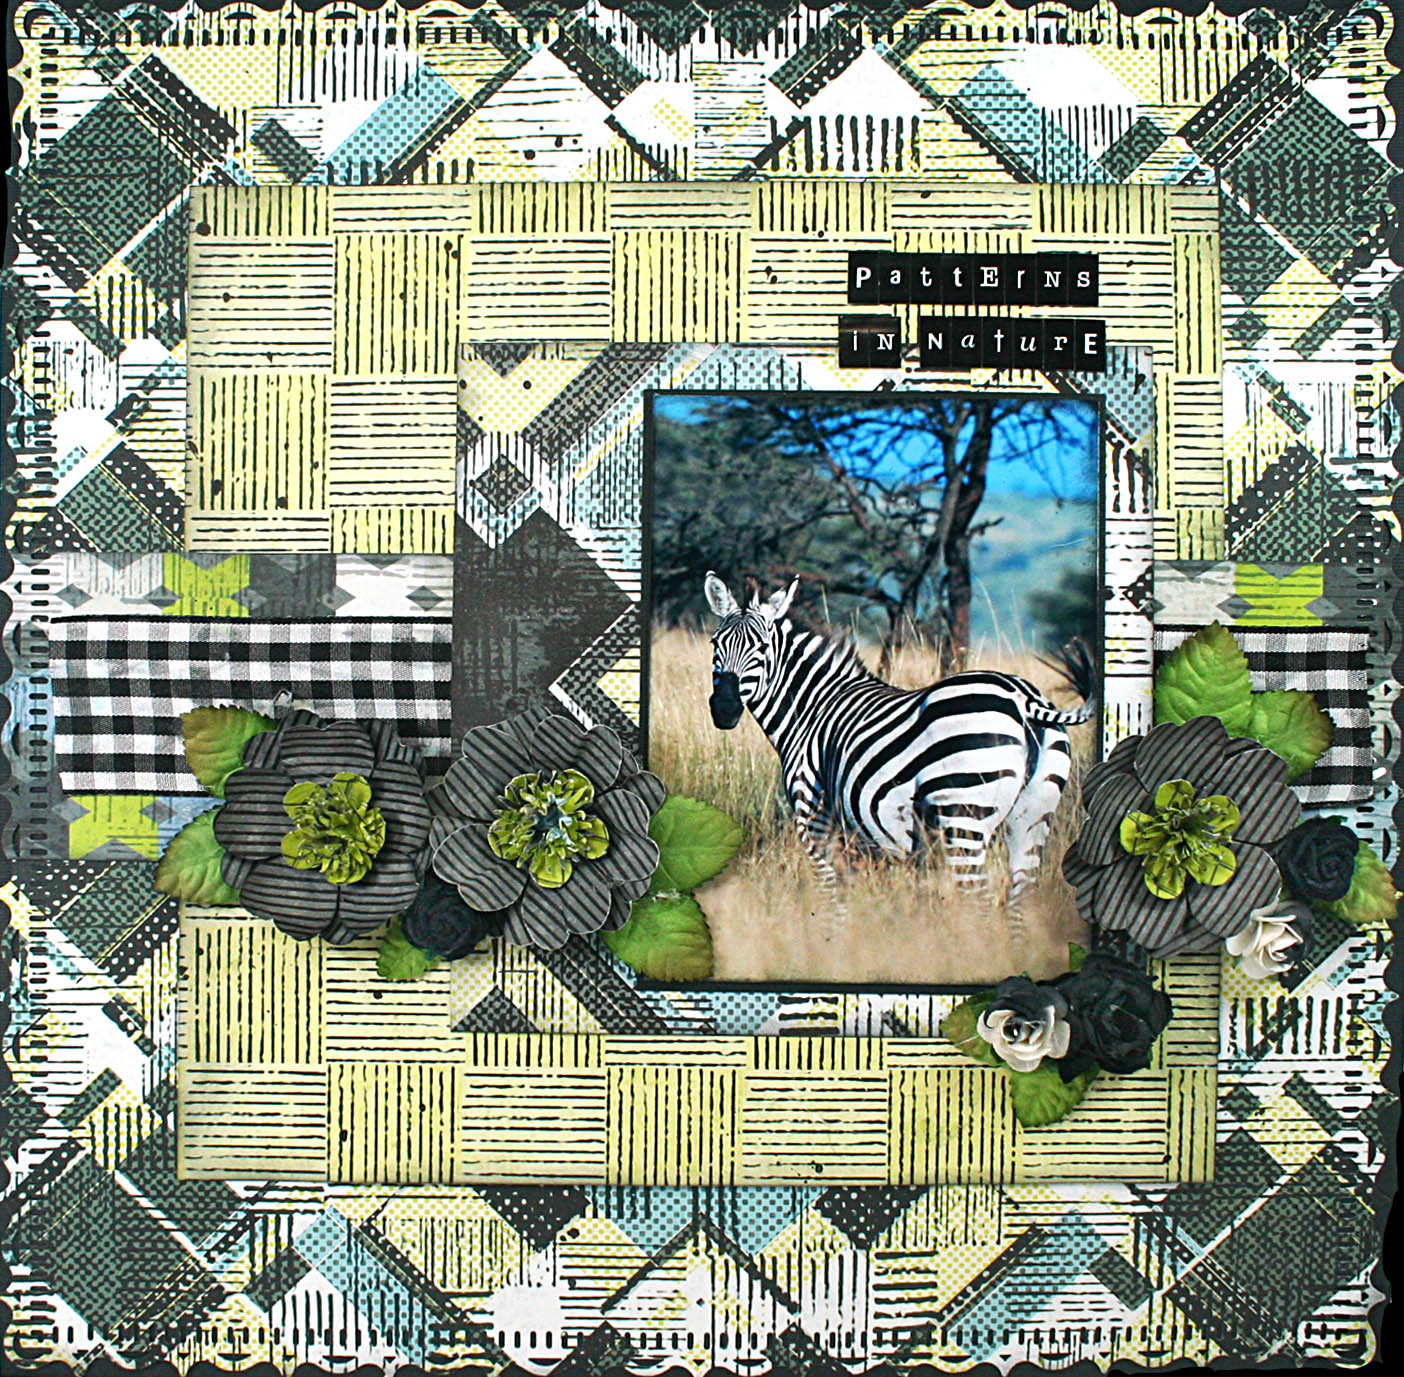
This collection lends itself to so much more than teen layouts. Since I don't have teens or any human children for that matter, I've resorted to using animals with this collection. I think this zebra photo goes really really well with #Teens. I love the different patterns in the paper along side this beautiful zebra dressed in such a pretty coat! :-)
Now then, I call this a CAS layout, i.e. clean and simple, because it is just that. I've used a few simple layers to put this together; start to finish, it took me 45 minutes plus another 30 to make the flowers. The photo is still the star of the show, as it should be, and the flowers and ribbon keep it from being overly plain. This is my brand of CAS!
For This Project You Will Need:
Fabscraps C80 #Teens
Collection:
·002 Zero Tasking - 2 sheets
·005 Type T - 1 sheet
·006 Togethering - 1 sheet
Other:
·Black cardstock - 1 sheet
·Embellishments:
flowers, leaves, letters, etc.
Instructions:
Cut the center out of the black cardstock leaving a 1" frame
all around.
Border punch 002 Zero Tasking all around the paper. If you don't have border punches, you
can trim the paper to 11.5 x 11.5".
Cut a rectangle about 5.5 x
5.75" from the center of the page in step 2. Set aside for now, we'll use it later
for as another layer.
Layer 002 Zero Tasking from step 2 over the black cardstock frame.
Cut a piece 8.75 x 8.5" from 002 Zero Tasking. Layer this over the paper from step 4,
placing the opposite side of the paper face up, about 1.5" from the left side and
1.75" from the top.
Cut a strip 2 5/8 x 12" from 006 Togethering. Adhere a ribbon on the center of the
strip, layering this in the center of the page as shown.
Now layer on the small rectangle from step 3.
Mat your photo onto black cardstock and add your photo to the
layout as shown.
Add a title over the photo.
Embellish with flowers, leaves etc.
I handmade the striped flowers from 005 Type T with a McGill
Floriano punch.
I am so excited to be rejoining the design team at the Flying Unicorn after a 2 year hiatus! I have missed all my many friends and fellow design team members there.
Congrats to everyone, I am so looking forward to working with all of you!
Do you have your Thanksgiving menu planned? Have to say that my menu never varies from year to year, its the same. My family would be quite upset if any of their favorite dishes were missing! Mom helps me make the sausage dressing 'cause hers is better than mine. Then there's the sweet potato souffle that is soooo divine, yum, it has pecans on top, no marshmallows in this house. For my SIL and me, we have tons of creamy mashed potatoes, giblet gravy... well you get the picture!
Anyway, I wanted to create something small, but pretty, for my Thanksgiving table
and was inspired by nature's vivid fall colors of red and gold. I am limited as to what I can do because of all the food on the table. I had a quick flash of brilliance and decided
to use Botanicabella papers, jute twine,
and burlap to create rustic napkin rings
and place cards. They will surely add a
homespun touch of nature's beauty to my table and still leave room for all that
delicious food!
I've recorded a video showing you how I make the napkin rings and placecards.
The placecards are made from Graphic 45 Artist Trading Tags and the are two sided. I put names on one side and some fussy cut elements on the other.
The napkin rings are made from toilet paper rolls covered with burlap. Add some fun twine, a pretty chippy and a flower and you've got a really pretty napkin ring with a rustic touch.
For a finishing touch, I've added touches of Stickles on the flower petals, I think it adds a nice holiday sparkle to my table.
The Time to Flourish collection is not only great for making calendars, it works really well for making cards. This is a simple fall card that I put together in just a few minutes using a cut apart from the November page and some scraps that I layered together. I diecut a small Spellbinders frame and used it under the floral cluster and chipboard piece.
Look to the cut aparts and Ephemera cards in the Graphci 45 collections when you need a quick card. They are great because you can mount the card on a cardstock card base, add a few quick layers and/embellishments and you're done in no time!
I love scrapping my poodles and Fabscraps #Teen collection sure works well with my photos! My girls love to go out in the yard and play. We are lucky to have a very large fenced (almost a half acre!) area where they can run and chase to their heart's desire.
I used alot of mixed media on my background. Scroll down to the bottom to read my process.
For This Project You Will Need:
Fabscraps Jungle C80 #Teens
Collection:
·005 Type T
·006 Togethering
·007 Staycation
·008 Hash Tag
·MC80 001A Carder's Pack
Other:
·Mask and masking paste
·Paint
·Black ink and texture stamp
·Martha Stewart Cherish Punch Around the Page punches
·Embellishments
Instructions:
For the base page, 005 Type T:
Stamp all over with a texture stamp and black ink. Then, use a mask and do some random
masking with white masking paste.
After that dries, stamp on some green color to match the green in
006, Togethering.
Cut an 8" circle from 005 Type T and adhere to the left side
of the page as shown.
Fussy cut a stripp 1.75" x 12' from 006 Togethering. Adhere this over the circle near the
center of the page as shown.
Mat two photos onto 007 Staycation.
Cut a rectangle 5.375 x 7.25" from 006 Togethering. Notch the
edges if you wish. Adhere over the
circle as shown.
Cut a rectangle 5 x 7" from 007 Hash Tag and lap over the
rectangle from step 5 as shown in the photo.
Cut a rectangle 5 x 6.75 (or
whatever fits with your photos) and border punch the edges. Adhere your photos to this and then use
cardboard or foam tape to pop it up and adhere about 2.5" from the
right side.
Pop out two arrows from the tags in the Carder's Packm pop up with
foam tape and place them as shown on the right side.
Creative Embellishments is a proud sponsor of CSI and this month our design team is filling in as guest detectives.
Here's the beautiful color palette for case # 182.
For my evidence I've chosen to present leaves and vines, a diecut poodle (the animal), and scalloped border seen as a layer under my photo and the gorgeous scalloped chipboard at the top of the page, and a pretty mint green bow.
My testimony is about the final act of kindness we must do for our beloved furbabies when it is their time to cross the Rainbow Bridge. I'd just like to say a few words about that, it is the hardest thing I have ever done but I am so glad that I have been with my babies when they left this world. If you are afraid, please believe me when I tell you that it is such a peaceful crossing and not frightening at all. The first time I was faced with it, I couldn't do it and my dear husband kindly stayed with my girl as she passed. The next time I put on my big girl britches and accompanied him when we said good bye to sweet Brandy, our shepherd lab mix. I really can not express to you how glad I am that I was with her, just knowing that both our loving hands were the last things she felt when she passed. Since then I alone, had to watch Chili pass and then my husband and I said goodbye to our dear Chena.
I know this is a personal decision and I do respect your right to do it however you can. But I urge you, stay with you beloved animals until the very end. They deserve that final act of love and compassion from their humans.
I've used Creative Embellishements fabulous chipboard on this layout! Stop by the store and check out all our fabulous designs, new products and special sales!
Have a look at this new collection from Fabscraps, #Teens Collection. Its perfect for scrapping your teens or for some grungy layouts. Oh but wait, I paired grunge with glam for my layout of my sweet poodles playing in the yard. The grunge is splatters and the glam is the Manor House florals.
For This Project You Will Need:
FabScraps C80 #Teens Collection:
·002 Zero Tasking - 1 sheet
·004 Free Range - 1 sheet
·007 Staycation - 1 sheet
·DS 040 Stencil
Other:
·Black cardstock - 1 sheet
·Mask and white masking paste
·Black ink
·Black mist or paint
·White and yellow paint paint
·Embellishments - flowers etc.
Instructions:
Trim 002 Zero
Tasking to 11.5 x 11.5". Cut
a 10" square from the center
and set aside for another use.
Distress the edges and then moisten and crinkle the remaining
frame..
Trim 004 Free Range
to 11 x 11". Distress the
edges and then moisten and crinkle.
Do some random
stenciling on 004 FreeRange using Fabscraps Stencil DS 040 and white
molding paste.
Adhere the frame
from step 1 to the black cardstock.
Cut a rectangle 2 x
5.75" from 004 Free Range. Cut
this from the center part of the paper that will be covered by 007 Staycation
(black brick wall - see the photo)
Layer and adhere 004
Free Range over 002 Zero Tasking.
Cut a rectangle 6.5
x 9" from 007 Staycation.
Splatter with white paint or use a paint splatters stencil.
Adhere the rectangle from step 7
on the left side of the page as shown in the photo.
Tuck the small rectangle from
step 5. under the right side of 007 Staycation as shown in the photo.
Mat your photo with black
cardstock.
Use foam tape or cardboard to
pop up your photo and position as shown in the photo.
Add a title. Embellish as desired with flowers etc.
Today I ask you to say a prayer for all the men and women serving in the Armed Forces all over the world. I'd like to share some pages I've done over the years of men in service.
My Dad receiving the Legion of Merit medal for exceptionally meritorious conduct in the performance of his duties. Dad earned two Legion of Merit awards during his 28 years in the Army, one for service in Vietnam and one for service in Germany. The Legion of Merit is one of the highest noncombat medals awarded .
This is my husband's grandfather getting ready to deploy to Europe during WW I. This photo is a real treasure to me. Love that "dough boy" uniform!
My husband's father during WWII. I love this photo so much. His Dad paid the ultimate price as he died during the Korean War when his plane crashed.
Another of our nation's heros during WWII. These aviator photos were so fabulous! This is one of my dearest friend's father.
My Uncle during WWII. He certainly was a handsome soldier!
My son-in-law, step daughter and husband at his reenlistment.
My aunt and uncle during WW II. After I got out of high school, my parents went overseas so my aunt and uncle's home was where I went for holidays and such. I called my uncle, "Uncle Daddy" as he was like a 2nd father to me.
My husband had already retired from 24 years in the Navy when we were married. I have not scrapped any photos of him in his uniform and that's a situation I need to remedy! This was our family when we were married, Leda the dobie and Tiffany the Yorkie. They were the best of friends and Tiffany was the alpha dog!
I love this sheet of music paper from Fabscraps Christmas Memories collection. It's a perfect background for just about any layout.
I made the poinsettias using a Sizzix die to cut all the petals. I sprayed them with Lindy's Blazin' Sun Glitz Spritz to give them a gold sparkle and I used gold stickles for the centers.
For This Project You Will Need:
FabScraps C78 Christmas
Memories Collection:
·005 Christmas Kiss - 1 sheet
·007 Christmas Children - 1 sheet
·008 Christmas Tags - 1 sheet
Other:
·Red and brown cardstock
·White and/or clear gesso
·Gold mist
·Gold and red Stickles
·Greenery punches or dies
·Tim Holtz Alterations Tattered
Pinecones die
·Sizzix Flower Petal and Centers
poinsettia die
·Die-namites Holly Branch
·Elizabeth Craft Designs Spring
w/Berries
Instructions:
Trim 007 Christmas
Children to 11.5 x 11.5".
Distress and ink the edges.
Paint 007 Christmas
Children with a mix of white and clear gesso. After that dries, randomly spray on some
gold mist.
Cut the center out
of a 12" piece of red cardstock leaving a 1" frame. Set the center aside to make the
flowers.. Adhere 007 Christmas
Children onto this red cardstock frame as shown in the photo.
Cut two 5"
circles from 007 Christmas children. I have used a Kaisercraft doily die
for my circles. Adhere one circle
about 1.5" from the left and about 2" from the top. Adhere the other circle about 2"
from the right and 2.5" from the bottom.
Pop up your photo with
foam or cardboard and center on the page over the circles.
Fussy cut two tags
from 008 Christmas Tags and adhere to the upper right of the photo leaving
room to add flowers and greenery.
Pop up the tags with some foam tape.
Arrange large and
small flowers around the photo along with some greenery and
pinecones. Use gold stickles for
the centers of poinsettias and red stickles to make holly berries.
I'm having fun scrapping with Christmas Memories from Fabscraps! It's such a pretty paper collection with traditional colors of red and green. Love pairing it with gorgeous red roses!
For
This Project You Will Need
FabScraps C79 Christmas
Memories Collection:
·001 Father Christmas
·005 Christmas Kiss
·006 Christmas Holly
·008 Christmas Tags
·MC79 001A Carder's Pack
Other:
·Cream cardstock
·Prima or Kaisercraft doily die
·Die-namites Holly Branch
·Red Stickles
·Sizzix frame
·Stampendous shabby white embossing
enamel
·Embellishments, flowers, berries,
etc.
Instructions:
Cut a 12" frame
from 008 Christmas Tags 1" wide.
Ink and distress the edges if desired.
Trim 001 Father
Christmas to 11.5 x 11.5" and then cut a frame 1" wide and layer
this frame over the frame from step 1.
Ink and distress the edges if desired.
Trim a 12 x 12 cream
cardstock to 11 x 11". Ink
and distress the edges if desired.
Layer the cream
cardstock over the two frames from steps 1 and 2.
Cut a decorative mat
about 11" x 11" from 006 Christmas Holly. I've use a WRMK Lucky 8 Classic Wreath
punch. You could cut something
similar with a Cricut or Cameo. Ink and distress the edges if desired.
Cut two doiles from 001 Father
Christmas. Adhere one in the lower
left corner as shown and adhere the other in the upper right corner as
shown in the photo.
Cut a mat 4.25 x
6.5" from 005 Christmas Kiss.
Ink and distress the edges if desired. Adhere about 1.5" from the right
side and 1" from the top.
Cut a smaller mat, 4
x 6" and border punch with Martha Stewart punch around the page
punches. Ink and distress the edges
if desired. Adhere over the mat
from step 7.
Die-cut a frame
similar to what I've used. Dabble
embossing ink randomly on the frame and sprinkle with Stampendous shabby
white embossing enamel, heat set.
Glue the frame over
your photo and use foam tape to pop up the photo and frame. Adhere over the layers in step 8.
Adhere the 2nd doily
in the bottom left corner about 1" from the left side and 1.5"
from the bottom.
Fussy cut a tag from
008 Christmas Tags and layer over the doily at the bottom.
Embellish with
flowers, holly leaves, berries, etc.
Use red stickles to enhance the berries.