Pages

Monday, October 31, 2016

Happy Hallowe'en in Wonderland with Graphic 45!

I've got two posts today, so be sure to scroll down and see the 2nd one!

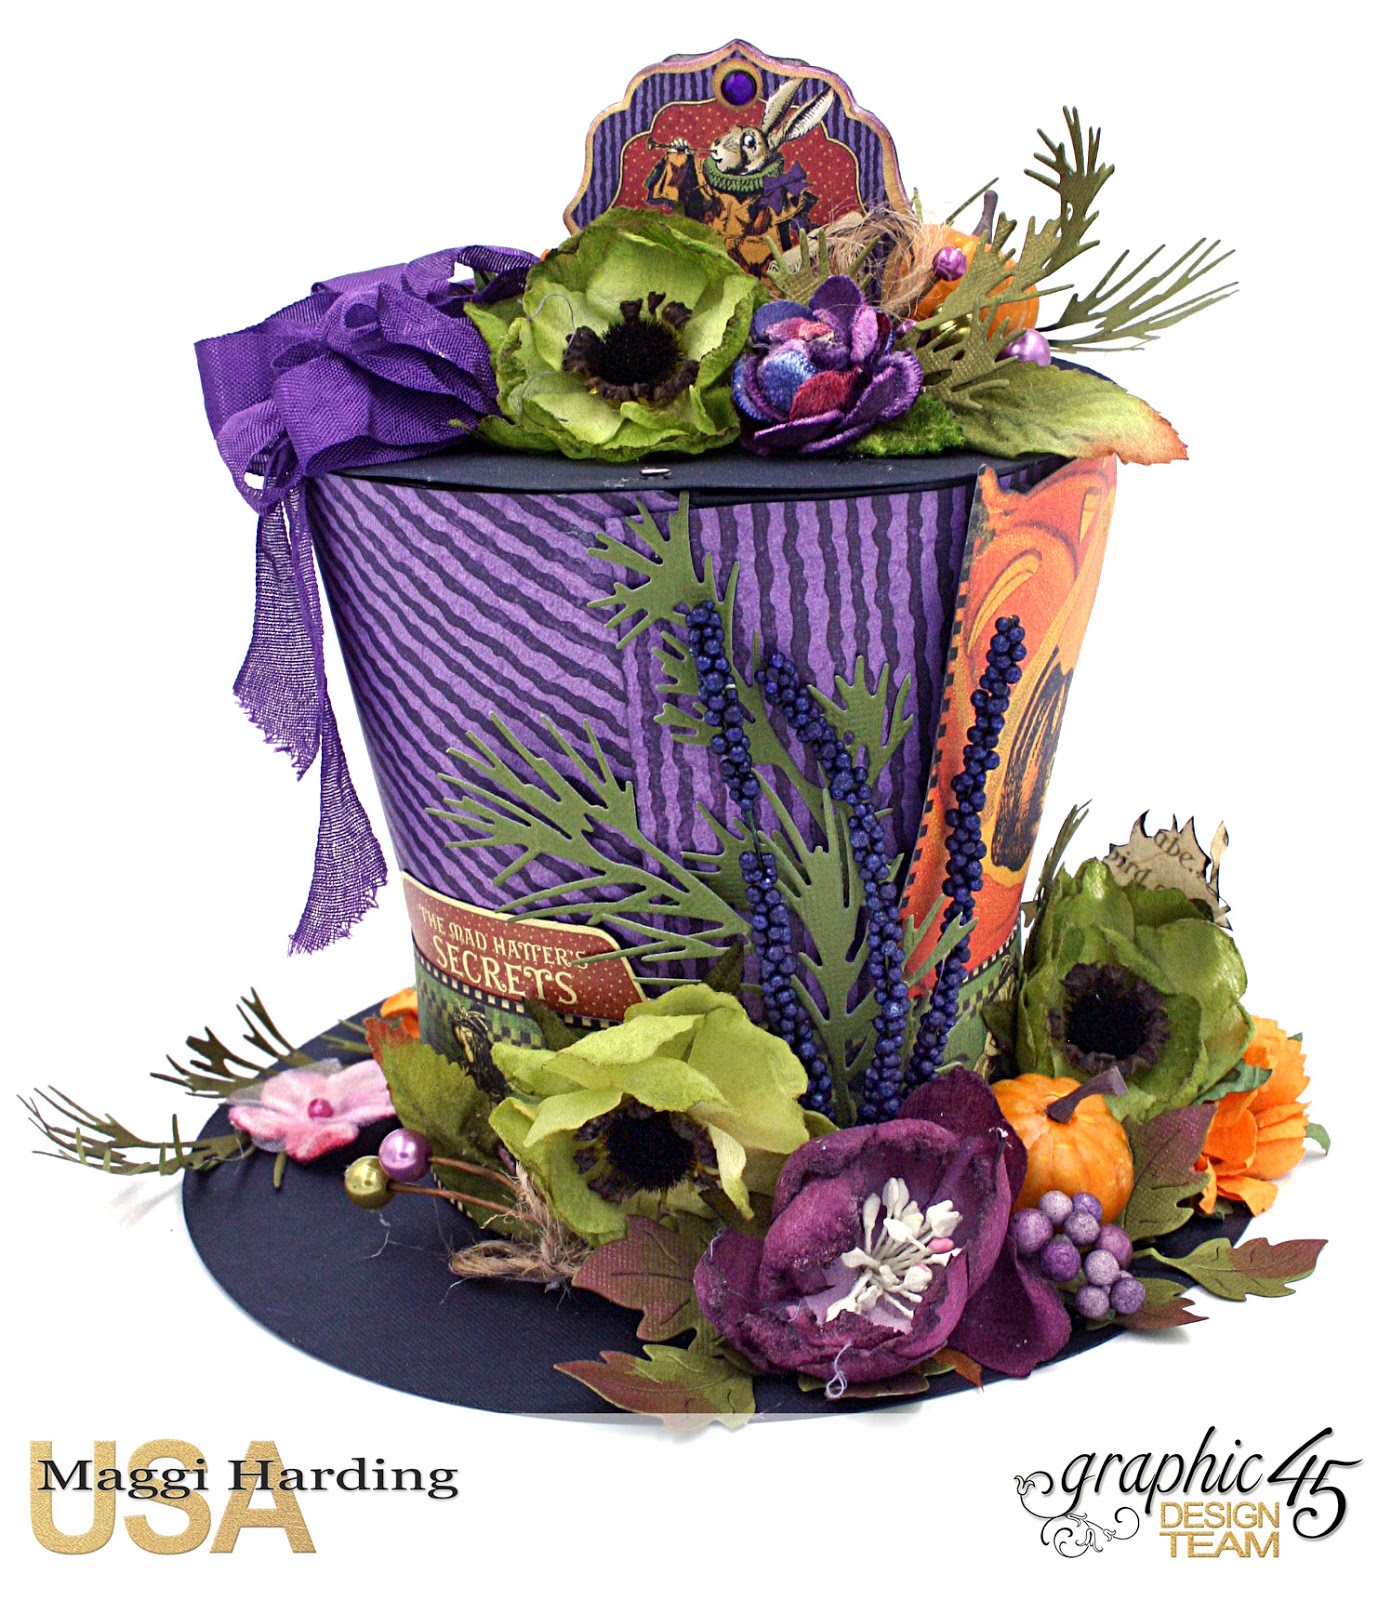
I really love making hats and so I thought it would be fun to make a hat with a surprise pop up element.  Alice pops up on this hat just in time for the tea party!

I used a small metal hinge on the back of the hat to attach the top of the hat to the crown.  To keep the circle top from falling inside the hat, I cut the top just slightly larger than the crown.  Alice is only attached to the top of the hat and freely slides in and out of the hat.

I fussy cut several of the characters from Alice in Wonderland and have them staged around the hat intermingled with lots of pretty blooms and pumpkins.

Tips:  You can stand chipboard pieces up like I did on the top of the hat by building a slot from foam tape to hold the chipboard.  Just take a double stack of foam tape and adhere to your surface.  Adjacent to that, add another double stack of foam tape leaving just enough space between the two stacks to create a slot to hold the chipboard.


When building things like this from scratch, use glue that is removable with Undo!  I use ZipDry glue and Scortape, both of which are easily removed with Undo.  Really this will save you much frustration, Undo is my best friend when I'm creating something like this!  Another thing that I like to use is Removable Glue Dots.  They are perfect for trial and error placement but once you figure out where you want something, be sure to adhere with something permanent as those removable dots will not hold.


Supplies:
Graphic 45 Hallowe'en in Wonderland Deluxe Collector's Edition
Black cardstock
Olive cardstock
Purple seam binding
Sizzix Alterations Holiday Greens die set
Petaloo Botanica Blooms Lavender/Purple
Petaloo Mixed Blooms Lavender/Purple
Petaloo Anemone x 6 Pistachio
Petaloo Vintage Velvet Minis x 9 Purple
Petaloo Spring Berry Picks Lavender/Purple
Tim Holtz pumpkins
small metal hinge

Happy Halloween from Creative Embellishments!


It's the spookiest day of the year and I've got a frightful targ (that's half card and half tag, ) for you and a candy/gift bag that needs to be filled up with treats for my favorite person.

Now this gift bag has been around the block a time or two.  My dear friend Billie, gave it to me  filled with cookies and chocolates and she had recycled the bag from a gift shop!  Now I've recycled it again and I'm going to fill it with treats and maybe a trick or two.  I used Authentique's Mysterious Collection for the background and embellished with Creative Embellishments Skull Corner Flourish.  I painted the skulls with watered down white paint and heat embossed the roses.


I used two flair buttons from Creative Embellishemnts in my floral cluster, the one on the bottom is from the Boo Flair Set and the one on the left is from the Happy Halloween Flair Set.  They are such fun pieces to add some Flair! to your projects.


I used some wood veneer bats to complete my spooky bag.


 You know me, even spooky things need to have pretty flowers so I've added some Petaloo blooms and a fun RRR spider web ribbon.


Now you need a fun card to go with that bag so I've made a jack o'lantern targ.  What's a targ? Well that's my creation that I'm waiting to storm the world.  So far, it's not happening, but oh well.  A targ is a cross between a tag and a card!  I used a Graphic 45 black tag as my background and to that I attached a small purple card layered over a spider web that I heat embossed with silver aged embossing enamel.  I used Creative Embellishments' fun Stacked Pumpkins to decorate my card and another flair piece, also fron the Happy Halloween set.


Instead of tying a bow at the top of the tag, I added another flair button.

Creative Embellishments Products Used


Other Products
Graphic 45 Hallowe'en in Wonderland
Petaloo sunflowers
Really REasonable Ribbon


Thanks for stopping by!


Saturday, October 29, 2016

Hurray for me!


I am super excited to tell you that I am joinng the Cheery Lynn Designs design team.  Their dies are just the best I have used, the cuts are so crisp and usually one pass on my Platinum does the trick.  More intricate dies might require a 2nd pass but still, that is awesome!  The paper  releases from the die so nicely too.  All that plus so many gorgeous designs to chose from, WOW, thank you Cheery Lynn for inviting me to join you!

Friday, October 28, 2016

Graphic 45 & Scrapbook Adhesives Christmas Cards!


We're having so much fun this week using Scrapbook Adhesives products along with our Graphic 45 goodies!  Be sure to stop by the Graphic 45 blog and Scrapbook Adhesives blog and find out how to win some great prizes.
Ahhhh, I have the best of intentions and I always say, this is going to be the year that I send out handmade Christmas cards.  But, you know what happens, yep, I just never get around to it.  Now this is going to be the year, and I've designed a pretty but easy card and envelope to make this a quick, fun, and awesome project!

Tips:  Use an assembly line approach when making similar multiple items, i.e. cut,  score, etc. all the pieces at the same time.  Then line the pieces up in the order that they are assembled and quickly put them together.

I used Graphic 45's Staples Policy Envelopes and Square tags along with the new St Nicholas collection for my project.  They go so nicely together and I love the red envie!


I made a Snapguide tutorial so you can see how quick and simple it is to make this duo.


I purposely cut the card that is adhered to the tag slightly smaller than the tag so that I can cut 3- 4" x 8" cards from a single sheet of paper.  That will help make this an economical project.  The card and tag just have one other layer cut from the same sheet of paper and you can cut enough layers for several cards from one page.

I used Scrapbook Adhesives foam tape to pop up the tag on my envelope to enhance its festive and professional look.  

Scrapbook Adhesives' Adhesive Sheets made attaching my diecut flourishes and punches really quick and easy.   All you have to do is apply the adhesive sheet to your cardstock, diecut the cardstock with the adhered sheet, peel off the backing and apply.  This is such a great way to adhere intricate diecuts like doilies and flourishes with curlicues.

Those are Petaloo poinsettias that I blinged up with Crystal Stickles.

I used Scrapbook Adhesives foam tape to pop up the cut apart on the face of my card and finished it off with a pretty Christmas ribbon from Really Reasonable Ribbon.


I made a 2nd card and envelope too!  I really love the polka dotted Policy Envelope!


Thanks for visiting today!  This could be the year that you too, send handmade cards, who's with me?

Wednesday, October 26, 2016

Creative Embellishments and Heartfelt Creations blog hop

Creative Embellishments and Heartfelt Creations are blog hopping, what fun!   I made a Christmas layout with 2 photos taken Christmas Day 1950 of my husband and his siblings.  Aren't they cuties?

 The beautiful Heartfelt Creations Sparkling Poinsettia stamps and die along with Creative Embellishments chipboard pieces go perfectly with Graphic 45's new St Nicholas collection.   I used Creative Embellishments Vintage Flourish Set 3 that I heat embossed with Ranger Bridal embossing powder under the floral cluster.  I cut apart a Holly and Berry Flourish to enhance the pretty poinsettias. I inked the holly leaves with distress ink and used red stickles for the berries.

 I used gold ink to stamp the poinsettia image and then die cut the flower with the matching die.  Easy to do and makes such a pretty poinsettia.  The holly looks really great peeking out from behind the flower.

I love the vintage flourish, its perfect on this layout.

Creative Embellishments products used:

Heartfelt Creations products used:


Thanks for visiting today!


Monday, October 24, 2016

Petaloo Halloween and Thanksgiving Pumpkins!

This is my kind of home decor because it works for both Halloween and Thanksgiving!  My life is just so busy that I need things that are pretty but simple and quick and it's a real bonus if it works for more than one holiday!

I bought some inexpensive pumpkins at Hobby Lobby and, they were on sale, to begin my project. Then I got together a lovely assortment of Petaloo flowers and some Creative Embellishments chipboard pumpkin vine pieces.  I used distress inks to color the  vines, that was quick and easy.  Now all you need to do is glue the vines and flowers around the pumpkins and add a festive bow.  Easy, peasy, pretty!


To turn this into Halloween  decor, I used Authentique's Mysterious Collection.  I cut out the fun quote from the Collection Kit and made three ATCs.  I glued the quote onto a piece of wire and stabbed it down in one of the pumpkins and strategically added the ATC's.  Voilà, now it's Halloween!

I gussied up my floral clusters by diecutting some leaves from Authentique's Mysterious papers.  I used Cheery Lynn Designs - Fall Leaves (B838) dies for those.


ATC's are fun and  quick to make and they're a great way to use up your scraps.  I added a couple Petaloo flowers and Creative Embellishments flair to dress this one up.
 I used some fun spider web ribbon from Really Reasonable Ribbon for this fun ATC along with Petaloo burlap flowers.

A little fussy cutting, flowers and ribbon, go along way to make fun ATC's!  I love that kitty peaking out of the pumpkin!

Petaloo Products used:
Textured Elements Blossoms x 4 - Apricot 1256-208, Ivory 1256-200
Canvas Sunflower Mini, Ivory RS5002-200/4
Mini Mix x 8 Teastained Cream 1462-105
Burlap Blossoms x 10, black 1201-209
Jeweled Florettes Lav/Purple/Green/Black 1350-220D

Other Products:
Creative Embellishments Pumpkin Vine Flourish
Creative Embellishments Haunted Flair Set
Cheery Lynn Designs - Fall Leaves 8 Piece Die Set - B838


Thanks for joining me today and checking out my Halloween/Thanksgiving decor!


LinkWithin

Related Posts Plugin for WordPress, Blogger...